To ensure a portable rig runs continuously, creators use intelligent Power Delivery (PD) protocols over USB-C. Utilizing multi-port, high-output battery packs (65W or higher) allows a single power source to energize the camera body, the E1589 interface module, and any auxiliary monitoring equipment simultaneously. This strategy eliminates the need to carry multiple proprietary battery chargers into the field. 2. Wireless Monitoring Protocols
The keyword is a highly specific, fragmented search query. It mixes distinct concepts: high-end lighting aesthetics ("lustery"), specific technical or catalog identifiers ("e1589"), seasonal visual themes ("autumn"), photography/videography setups ("cam"), and the desire for a flexible, on-the-go workflow ("i could do this al portable").
Refers to the crisp, breezy, and unpredictable weather of the fall season, which demands comfortable, wind-resistant, and flexible apparel. E1589: This is the exact manufacturer style code for the J.Crew 484 Slim-Fit Stretch Chino Pant Go to product viewer dialog for this item.
Sometimes, the least sophisticated tool (an old portable cam, a forgotten model) captures the richest seasons of life – not because it's advanced, but because it asks you to be there , not just record. lustery e1589 autumn and cam i could do this al portable
, a popular men's wardrobe staple. The "Autumn" and "Cam" parts of your query likely refer to specific seasonal colors or limited-edition washes offered within this product line.
As I ponder the possibilities, I find myself drawn to the notion of capturing the beauty of the world around me through a portable camera. The term "cam" brings to mind the countless memories I've made while traveling, snapping photos and videos that serve as tangible reminders of the incredible experiences I've had. Whether it's hiking through the mountains, exploring new cities, or simply observing the changing seasons, a portable camera allows me to preserve the moments that make life worth living.
of the E1589 if it's a specific type (e.g., a projector, lamp, or heater). Provide creative ideas for an autumn photoshoot. To ensure a portable rig runs continuously, creators
By combining lightweight mirrorless cameras, fast glass, diffusion filters, and highly portable battery-powered LEDs, creators no longer need to be anchored to a studio grid. You can pack a complete premium studio workflow into a single travel bag and easily execute professional, glowing autumn productions on the go.
Look for compact mirrorless camera bodies or advanced action cameras that feature internal stabilization. Excellent choices include the or the DJI Osmo Pocket 3 Go to product viewer dialog for this item.
Hardened physical sealing and sensor-glass anti-condensation coatings. Eliminates lens fogging and component failure in cold air. Refers to the crisp, breezy, and unpredictable weather
That October, Leo took the into the woods each morning. He filmed mist rising from the creek, acorns dropping, his dog Autumn (a chestnut-colored retriever) bounding through piles of leaves.
is available on the official Lustery platform, which is mobile-responsive, allowing you to watch it on any device like a phone or tablet.
Your primary (e.g., real-time live streaming, cinematic post-production, or mobile platform optimized).
To achieve this with the E1589 Autumn, portability is key. Modern versions of these luminaries often feature:
Polyforms are shapes built up from identical parts glued together. The best known polyforms are the twelve pentominoes, which are all the shapes that can be made by gluing 5 squares edge to edge. They contain 5×12=60 squares all together, and can in fact be arranged to form a rectangle of size 3×20, 4×15, 5×12, or 6×10.
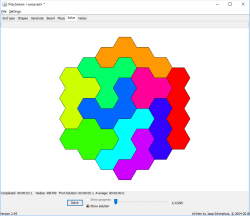
PolySolver is a Java application with which you can make and solve many polyform problems, such as puzzles involving pentominoes, hexiamonds, or many other such tile sets, with which you have to build a particular shape. I have tried to make this application both versatile and easy to use. The most important features are:
The program has a number of screens, which you can select using the tabs along the top, as well as a file menu. The screens are:
| Grid Type: | Choose the shape of the grid to work on. |
|---|---|
| Shapes: | Manually define or edit the shapes of the pieces. |
| Generate: | Generate complete sets of pieces. |
| Board: | Define or edit the shape of the board. |
| Place: | Place some pieces on the board, or try to solve the problem yourself. |
| Solve: | Let the computer attempt to solve the problem. |
| Notes: | Keep notes related to the problem. |
The file menu and these screens will now be explained in a little more detail.
The File menu has the following options:
| New: | Creates a new empty puzzle. |
|---|---|
| Open: | Opens a previously saved file. |
| Save: | Saves any changes you have made in the current puzzle. |
| Save As: | Saves the current puzzle to a file, with a file name of your choice. |
| New from template: | Creates a new puzzle, starting with the contents of the selected template. |
| Select template: | Selects a file to use as a template. Useful for making variations of a puzzle. |
| Download: | Downloads any of the available puzzles from the server. |
| Upload: | Uploads your puzzle to a file on the server, sharing it with all other users of this program. A password can be provided so that no one else can edit it. |
| Remove: | Remove a previously uploaded puzzle. If the puzzle file is password protected, the password must be entered before deletion takes place. |
| Rename: | Change the name of an uploaded puzzle file. If the file is password protected, the password must be entered before renaming takes place. |
| Change Password: | Change the password of an uploaded password-protected puzzle file, or set a password on an unprotected file. |
| Exit: | Exits the program. |
Note that the password protection on the server is rather trivial, so do not use a password that you use anywhere else. Note also that the server file name must consist only of letters, numbers and underscores.
Here you can choose the shape of the grid to work on. Simply click on one of the types
listed on the left. In the centre you will see a preview of this grid.
Note that you cannot change the grid type if there are already shapes or a board
defined. If this is the case, you can use the 'clear shapes' and 'clear board' buttons
to remove those definitions.
Some of the grid types you can choose from are:
| Triangle, Square, Hexagon: | These are the three regular grids most commonly used in these problems (44, 63, 36). |
|---|---|
| Cube: | A 3-d arrangement of cubes, displayed with layers side by side. |
| Tan: | A grid of squares that are divided into four 45-45-90 triangles. |
| Isosceles Triangle: | A grid of isosceles triangles, like the regular triangular grid but streched in one direction. |
| Drafter: | A grid of hexagons divided into twelve 30-60-90 triangles. |
| Rectangle: | A square grid that is stretched along one axis to make rectangles. |
| Brick: | A rectangle grid where the rows are offset like in a brick wall. |
| Diamond: | A 'squashed' square grid, made of diamond shapes. |
| Kite: | A grid made of kite shapes. |
| Cube Tiling: | A grid made of diamonds that are put together in hexagons, and which looks like a projected array of cubes. |
| Octagon: | A grid made of octagons and squares (4.8.8). Checkerboard problems on a square grid can be solved on this grid instead. |
| Unequal Squares: | A grid made of large and small squares. Similar to Octagon but without reflections. |
| Cairo: | A tiling made with non-regular pentagons, also known as the Cairo tiling. |
| Split Cairo: | The above Cairo tiling with all pentagons split in two. |
| Nonagon: | A tiling made of regular nonagons and 6-pointed stars. |
| Snub-Square: | A tiling of regular triangles and squares, with two non-adjacent squares at each vertex (3.4.3.3.4). |
| Split Snub-Square: | A Snub-Square tiling in which the squares are divided into four tan triangles. |
| Rhombitrihex: | A tiling of regular hexagons, triangles and squares (3.4.6.4). |
| Split Rhombitrihex: | A Rhombitrihex tiling in which the hexagons are divided into six regular triangles. |
| Heptagon: | A tiling made of regular heptagons and irregular pentagons. |
| Dodecagon: | A tiling made of dodecagons and triangles (3.12.12). |
If there is any other kind of grid that cannot be easily simulated by one of these, please let me know so that I can add it.
On this screen you can define the shapes of the pieces. An empty section of the grid is shown in the editor. When you move your mouse over it, the cell under the mouse pointer is outlined in red. If you click, that cell is added to (or removed from) the current shape. Note that the section of the grid is resized and centred after each change you make. You can click and drag to select a large section of cells, which will be changed when you release the mouse button.
By changing the 'piece' option you select which shape is currently shown in the editor. The last of these is always an empty grid, so you can add a new piece there.
If you want multiple pieces of the same shape, you should change the 'Amount Max' option to the correct amount. If you were instead to define the identical shapes separately the solver would later treat those tiles as distinct, and therefore solutions that differ only by swapping identically shaped pieces would be treated as distinct as well. If you want to force a certain number of a piece of a shape to be included in every solution, then you can change the "Amount Min" option.
By default, all rotations and reflections of the piece will be allowed. You can select one of the options None/Rotations/Reflections to change this behaviour. Choosing 'None' means that the piece will not be rotated at all, and will be used only in the exact orientation(s) you defined. Choosing 'Rotations' means that only rotations of the defined orientation(s) will be used.
You can select the display colour that you want the piece to have. If you press the button with the coloured square, a colour selection dialog appears where you can choose your preferred colour. You can remove the colour by pressing the Clear Colour button. Any uncoloured pieces will be given colours automatically when used later.
If you wish, you may define the various orientations of a piece yourself. To do this, simply change the 'Orientation' option, and add a new shape for this piece. This can be useful if you want to restrict its rotations in a particular way, or if you want a piece to look different when turned over. See the examples later on.
The rotate and mirror buttons will rotate or reflect the currently
displayed shape orientation. Copy will remember the currently displayed
shape orientation, and with the paste button this copy is added as a new
orientation on the current shape.
To clear the current orientation shape in the editor, you can use the 'Delete' button.
On this screen you can generate sets of pieces. You can create a tile shape, and let the program join together copies of that tile in all possible ways, so generating a complete set of shapes. The list of shapes generated in this way can then be added to the shapes you want to use in your polyform puzzle.
On the left of the screen is an editor similar to the regular Shapes screen. There you can click cells to build a shape. In most cases this will be the monoform you want to use, i.e. the basic shape from which the set of pieces will be built. As before, click any cells you wish to add or remove from the shape. The "Expand" button adds all neighbouring cells to your shape, and the "Clear" button will clear the editor.
To directly add this shape to the list, press the 'Add Tile' button. If you press the 'Join Tile' button, the tile will be joined to the shapes on the list in every possible way to create a new set of pieces. For example, suppose you are using a square grid, and in the editor on the left you have clicked only a single square for the tile shape, i.e. the tile is the monomino. By repeatedly pressing the 'Join Tile' button the initially empty list first contains only a monomino, then only the domino, then the two trominoes, then the tetrominos, the pentominoes, etc.
Note that the shapes generated in this way are not automatically part of the polyform puzzle you are defining. Pressing the 'Add List' adds the generated pieces to the current set of pieces of your puzzle. You can review and further edit those pieces on the 'Shapes' screen.
The 'Delete Shape' button is used to delete only the current shape from the generated list. The 'Clear List' button on the other hand empties the whole list. The 'Add list' button adds all the pieces in the generated list to the shapes used in your puzzle. No check is made for duplicates at this stage, so you may wish to review the shapes by going to the 'shapes' screen.
On this screen you can define the shape of the board. It is very similar to the shape editor, and therefore needs no further explanation.
On this screen you can place some pieces on the board yourself. In this way you can try to solve it yourself, or partially solve it so that later the solver will try to complete the solution.
The main part of the screen shows the (still empty) board. On the bottom of the screen is a view of one of the pieces. With the controls at the bottom right you can change which piece is shown, and choose its orientation. Clicking on the piece will pick it up or drop it again. When a piece has been picked up, its outline is shown which moves with the mouse pointer. Move over the board, and click when you want to drop the piece. You can pick up a piece that is already on the board (if you aren't carrying another piece already) by clicking it. Note that the controls for selecting the current piece and its orientation work still when you are carrying a piece. Right-clicking while carrying a piece will rotate it, and right-clicking while not carrying a piece will pick up another copy of the currently selected piece if available.
On this screen you can let the computer attempt to solve the problem. You can select
what kind of solution you are looking for:
Fill all: The whole board is to be filled without gaps
Fill most: Fill as many cells of the board as possible.
Use all: Fit all the pieces on the board.
Use most: Fit as many pieces on the board as possible.
Then click the 'Solve' button to start the solver.
During the solve, the display is frequently updated to show the current position it is examining. There is also a timer that shows how long the solver has been running, the average search time per solution so far, and a node counter which indicates how many times the solver has attempted to place a piece.
Once solutions are found, you can choose between showing a solution or showing the current search with the 'progress/solution' options. When you choose 'solution', the slider bar allows you to select which of the solutions is displayed.
A solution is an arrangement of pieces that completely fills the board (possibly with some pieces left over), or an arrangement in which all the pieces are placed on the board (possibly with some space left over). In other words, a solution uses up all the pieces, or uses up all the board (or both).
Note that no checks are performed on the piece sizes. For example it is obviously impossible to cover an odd area with dominoes (whose area is even), but if there are more dominoes than fit on the board, the solver will try to fill the board anyway.
The solving algorithm the program uses is a version of DLX, the 'Dancing Links' algorithm by Donald Knuth (P159 on his preprints page.) It is a depth first tree search which cleverly treats pieces and cells of the board in the same way, so that it either fills the board cell where the fewest pieces fit or places the piece that has fewest remaining possibilities. By doing so, the branching factor is kept as low as possible. I have made three minor adaptations to the algorithm. Firstly, if the pieces don't always cover the whole board, extra monotiles are added, so that there is never any need to deal with empty parts of the board. Secondly, you can have multiple copies of polyforms, so the matrix columns in the DLX algorithm that represent those pieces have to be covered several times rather than exactly once. Thirdly, if the pieces (plus any added monotiles) don't cover the board exactly there will be pieces left over, so then the DLX matrix columns representing the polyforms need not be fully covered.
On this screen you can type in any text that you want to keep with the puzzle.
All the examples listed here can be downloaded from the server via the File menu, are available in this example.zip file, or can be downloaded individually below.
The canonical example is always the set of pentominoes on a rectangular board. Lets first try the 3×20 rectangle. Every solution can be flipped over or rotated 180 degrees to get another arrangement which solves the problem. We would consider these solutions to be identical, but if they were counted separately you would get four times the actual number of solutions. We don't want all these to be counted separately, which is what would happen if we allow every piece to be rotated and flipped.
A solution to this is to restrict the L pentomino for example. It fits on the board in exactly four orientations, which would all occur in those quadruply counted solutions. The L pentomino has been drawn horizontally, aligned with the long axis of the rectangle, and the 'none' option has been chosen so that no rotations or reflections are allowed of that piece.
This problem has 2 solutions.
On the 4×15 rectangle we again have the problem of quadruply counting solutions. Restricting the L pentomino like before is not correct, because the L actually fits on the board in 8 orientations, and we want to allow only two of those 8. Therefore we can define the two allowed orientations of the L by hand. I have drawn one vertical and one horizontal L, and set its symmetry option to 'None'.
This problem has 368 solutions.
The board is an 8×8 square with a 2×2 hole in the centre. This board has 8-fold symmetry, so now we can simply restrict the L pentomino (or any other non-symmetric pentomino) to one orientation.
This problem has 65 solutions.
This problem uses the pentomino set to tile a chessboard. The pieces are however made from alternating black and white squares, and the resulting pattern should be also. This program does not allow such colourings. Using the octagon/square grid pattern we can solve this problem anyway, because we can identify the black squares with the octagons, and the white squares with the squares of the grid.
In this puzzle the pieces all have a different colouring on one side than on the other. Therefore I have set the 'Rotations' option on every piece (instead of the Reflections option), and defined two orientations, one for the front and one for the reverse.
As defined, the solver gives 4 solutions. These are similar to each other (rotated 180 degrees, or flipped over). To avoid that, you could restrict one piece as before (e.g. the L pentomino, defining only a vertical and a horizontal version, and setting the 'None' option).
It is possible to use 45 Y pentominoes to fill a 15×15 square. To do this in the solver, simply define one Y pentomino shape, and set the 'Number' option to 45. It is unfortunately not possible to eliminate multiply counted solutions the way we did before. The program will find 1696, but there are really only 212 solutions to this problem, and each is counted 8 times.
If you insist one finding each solution once, you can split the problem up into subcases. We can define the orientation of any solution by the orientation of the Y pentomino that covers the centre cell of the board. By restricting ourselves to those solutions in which that centre pentomino has a particular orientation, say horizontal with its arm at the top right, we can be sure of counting each solution exactly once. By placing that centre piece beforehand, we can be sure that no solutions will be double counted. Not only that, it is faster as well as the search space is reduced. This leads to 5 subcases, depending on which part of the Y pentomino covers the centre cell.
These subcases are:
Y_pento_in_15x15_A 120 solutions
Y_pento_in_15x15_B 0 solutions
Y_pento_in_15x15_C 0 solutions
Y_pento_in_15x15_D 0 solutions
Y_pento_in_15x15_E 92 solutions
Polycube problems can be defined in the program by using the cube grid. The layers of the pieces and the board will be shown side by side. A square in a layer will be marked by an X and/or O if it is connected to the same square in the layer shown to the left and/or right. For example, twenty five N pentacubes can fill a 5×5×5 cube. Because of the symmetries of the cube, every solution would be counted 48 times, unless we use a similar trick as in example 5. By placing a piece in the centre cell we fix the orientation of the solution. Unfortunately we will still get mirror image solutions (those with the layers in reverse order) because the pieces are mirror symmetric in three dimensional space.
There are three subcases:
N_pento_in_5x5x5_A 2 solutions
N_pento_in_5x5x5_B 6 solutions
N_pento_in_5x5x5_C 0 solutions
This gives a total of 8 solutions, but really only 4 when we discard the mirror images.
This problem involves packing 49 F pentacubes into a 5×7×7 box. It is now known that there are no solutions.
Send any comments or suggestions to .